Sunday, September 29, 2013

A few newer soaps!!

Trying some different techniques...except for the first one which is of course an IPS which I normally do. But I also attempted a funnel swirl and have used embeds on the watermelon (which turned out surprisingly well if I do say so myself.) :-)
 
Blue Sugar

                                           
Fresh & Fruity

Mandarin Mint

Watermelon

One of my all time favorite recipes...especially on cool Autumn days is one that I found years ago in a Marlboro cookbook. It's a little spicy, a lot meaty, and loaded with good stuff. I wanted to share it here because it is one of my favorites, and because I took a picture this morning as I was putting it together. :-)

And here it is:
Ingredients:
How to make it:
 
  • Cook bacon in a large chili pot or Dutch oven over medium heat until crisp. Transfer bacon to a large bowl; set aside. Pour off and reserve all but 2 TBS bacon drippings from pot.
  • Coat beef in combined flour, salt and paprika. Brown 1/3 of beef in drippings in pot; transfer to bowl with reserved bacon. Repeat twice with remaining beef, adding reserved drippings as necessary to brown beef. Add onions and garlic to last batch of beef, cook 2 minutes, stirring frequently.
  • Return beef and bacon to pot. Add beef broth, tomatoes, peppers and cumin; bring to a boil. Reduce heat; cover and simmer 1 1/2 hours. Uncover; continue to simmer 30-45 minutes or until beef is tender and chili is thickened.


Sunday, February 3, 2013

Some Newer Soap Pics

 Austrailian Bamboo
 Blackraspberry Vanill
Cherry Almond
 
 Kentucky Springs
 Love Spell
 Manly Man
 Miss Behaving
 Pepperberry Wreath
 Vanilla Bean Noel
Water Lily

Refinishing my Kitchen Chairs

So after much reluctance, I decided to go primitive. I mean I've always LOVED old stuff, and my daughter is a rustic/primitive guru, so the transformation was really inevitable. Anyway, I had a lot of changes to make and refinishing my chairs was only one, but it's what I'll share here. I've had these chairs for years, and they had seen a couple coats of oil base paint, so the first think I had to do was apply a thin coat of stripper and wait. Next came the fun part (and I use that term loosely)...the scraping:

 
I had to reapply stripper to some of the tougher spots. But after I had scraped all the paint off that I could I use my little sander on them, and smoothed everything as much as possible. By the way the top coat of green was no problem, but that bottom layer of blue OMG that was some seriously good paint. LOL!!

 
Then after repainting them black, and redoing the seat covers, I again used my sander to distress them a bit and here's the finished product.


Converting old china cabinet to primitive stepback

As I considered redecorating and changing over to the primitive look one of the things that kept holding me back was wondering what in the world I'd do with all the colorful glassware I'd been collecting for years. Since much of that glassware had a lot of sentimental value, I knew I would never get rid of it. So, what I finally decided to do was convert my china cabinet to a stepback cabinet. I did this by framing up the front and cutting doors that would set inside the frame. It took careful planning and precise measurement, because 1x12's are too expensive to make mistake on. ;-) I don't have pictures of the remodel, but I do have before and after pics. (also not the best quality, but I just had to share this I was so proud of the outcome)

Not a full length view, but this is how it looked with slideing glass doors on top and sliding wood doors on the bottom half.

 
And this is how it looks now with closing doors to keep all my precious glassware tucked safely away, only displaying what I choose:


So with the transformation of the cabinet, refinishing of the chairs and a few shelves and hand-framed prints I now have a wonderfully prim little dining area. :-)


Home Rendering Lard


Okay, I've got lots of stuff to share as I've not added anything in FOREVER, but I guess what I'll share first is my experience with rendering lard. I scoured the Internet and read up on the subject as much as possible before beginning. I learned that lard is much healthier than shortning and margarin, which wasn't too surprising. I also saw that there are different ways you can render lard, so I tried 3 of them to see which worked best. After cutting the (groung) fat into cubes I placed some with a small amount of water in my crockpot, some in a roasting pan in a 225 degree oven and some in a pot on top of the stove over low heat.


Now I just began to heat them slowly, and watch them very carefully as I didn't want them to get too hot and end up with a piggy smell. When the fat began melting the solid materials would seperate: 
 
 
(it works best if you remove the solids now with slotted spoon) then pour the liquid fat through a double layer of cheesecloth.

 
I stored the lard in jars and allowed it to cool and I was very pleased with the outcome.
 
 
I couldn't beleive it turned out white as snow! I almost hated to use any of it in soap. LOL! Also, I deciced that I liked the oven roasting method better. The crock pot was too slow and the stove top was too fast...but the oven was just right. :-)
 

Sunday, March 25, 2012

Sorry for the absence...

I've sorely neglected my blog lately, so let me start by saying I'm sorry about that. I haven't given up in DIY projects, and I have got a few things to share, but I've just been very busy with changing jobs and such and such. It's always something...anyway I'd like to try to add a few things as I get time. I'm sort of redecorating and I'd like to share that. Of course I'm still making soap, and getting ready for the Spring Craft Festivals in the area. I had my first experience with rendering lard yesterday and it turned out so nice so that is probably the first thing that I'll share. Anyway, it's good to be back. :)

Sunday, August 14, 2011

Goats Milk and Honey Soap

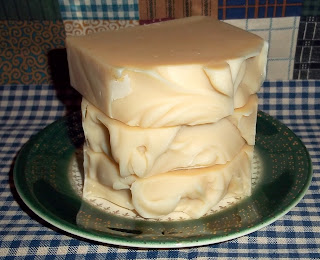
You've probably noticed that I like using milks in my soap recipes. Goats milk is another great milk to use because it has extra proteins, vitamins and caseins that are really good for your skin. My Goats Milk & Honey soap is only one of two soaps that I make that I don't add any fragrance or color to. So with the skin loving ingredients as pictured below, and the absence of anything that might irritate sensitive skin, this is a wonderfully creamy, gentle bar of soap that is safe for all skin types.
There are several ways to incorperate goats milk into your soap recipe. As with other milks, I like to use a half and half technique. That's why I like to use double strength canned goats milk. (that and because I don't have access to fresh milk) I use pretty much the same recipe that I normally use only replacing half the water with milk and adding honey, shea butter and vitamin e at trace.
I start by adding my lye to the 1/2 water. (in the form of ice)
I heat my honey to make it more fluid, then add it and the vitamin e to my goats milk so they can all be added at once when my soap reaches trace.
when my lye/water and oils are fully emulsified and begin to trace I add my goats milk/honey/vitamin e blend.
Last but not least I add my shea butter. You'll notice the color change due to the milk, but not to worry it will normally change back as it sets up. Anyway, after blending the shea in completely it's ready to go in the mold.
I immediately sat my mold over the air vent and put a fan on it to prevent gel phase, because I'd like for this batch to stay nice and light. By the next day when it's ready to cut it has changed back to a nice creamy color.
And here are the cut pictures.

Saturday, August 13, 2011

Making Beef Jerky

There are few foods that you could get everyone to agree on, but jerky is one that everyone in my family enjoys. And it's a GREAT snack food! Jerky is high in protein and low in fat, and when made at home you can enjoy it at a fraction of what it costs in stores. I normally use venison when making jerky, but sometimes you just can't wait till the Fall for a good batch of homemade jerky. I pretty much always use the same basic recipe. I may adjust the "spicyness" sometimes, but this is what I'll use for about 3-4 lbs of meat:

    1 C soy sauce
2 T worcestershire
2 T liquid smoke
1 T canning salt
1/2 T black pepper
1 T crushed red pepper
1/2 T garlic salt

Start out by slicing your meat. Trim away any fat. The thickness is a personal preference thing, I like somewhere between 1/8-1/4 inch. 
* slightly freeze the meat in order to make it easier to slice.

I like to mix my marinate ingredients in a shallow bowl, but a freezer bag works too.

Place one by one in the marinate so as to coat each piece, and refrigerate overnight.

I like to dry my jerky in the oven. So place the meat strips as close as possible without overlapping them on the oven rack and bake at lowest setting (150-175) for 5-6 hours.
That's it! Now get the floss ready and enjoy. :)


Saturday, July 30, 2011

Homemade Blackberry Jam

I love, love homemade jams, jellies and preserves. There's just something about that "wholesome goodness" knowing your fruits were picked fresh, and that you didn't add any flavors, colors or preservatives that makes the whole process well worth the time and effort invested. Besides that, they're just plain yummy! :) Jams aren't too difficult to make, and to be honest I usually just follow the directions on the fruit pectin box. So I won't bore you with a lot of details just what I use and the few steps to jelly making.
For a single batch I use:

5 cups crushed fruit
7 cups sugar
1 box fruit pectin

As with any canning procedure I start by sterilizing my jars.
Wash and crush ripe berries.
Measure out the ingredients, and bring the fruit and pectin to a boil. Add sugar.

Stir continually. Return to boil. When you reach a rolling boil that can not be stirred down start timing. Boil for 2 minutes. Remove from heat. Skim off any foam, and pour into hot jars leaving 1/4 inch head space.
Wipe rims of jars and cap. Invert jars for 5 minutes.
Then store upright in a cool, dark, undisturbed place, and enjoy!

Making Pumpkin Spice soap

As you probably guessed from the name, two things that this soap contains are pumpkin and spice. As with most of the soaps I do, my base oils are pretty much the same, I only need to make a few minor adjustments to create a spicy, fragrant bar that's too good to only make in the Fall. Since I'll be using 12 ounces of pumpkin, I discount my water for that amount and begin as usual mixing my lye water into my oils.
At light trace I add the 12 ounces of pumpkin.
(I used canned but it must be pumpkin not pumpkin pie mix)
I blend that completely in and add my fragrance oils. Then pour a small amount into a separate bowl where I've added 2 T of cinnamon to an ounce of warm avocado oil.
Blend in completely.
Then pour the spice part back into the pumpkin part in two-three spots. 
Then stir the pot 1-2 turns to get a nice swirl.
Now it's ready to be poured in the mold.
I normally gel this one because it's hard to avoid with the spices in there, but I wanted to try a sculpted top this time so I sat it over a vent with fan on it. It turned out pretty good. I love the Autumn orange color that you get naturally from the pumpkin, and the aroma is a "hit" year-'round.