Sunday, August 14, 2011

Goats Milk and Honey Soap

You've probably noticed that I like using milks in my soap recipes. Goats milk is another great milk to use because it has extra proteins, vitamins and caseins that are really good for your skin. My Goats Milk & Honey soap is only one of two soaps that I make that I don't add any fragrance or color to. So with the skin loving ingredients as pictured below, and the absence of anything that might irritate sensitive skin, this is a wonderfully creamy, gentle bar of soap that is safe for all skin types.
There are several ways to incorperate goats milk into your soap recipe. As with other milks, I like to use a half and half technique. That's why I like to use double strength canned goats milk. (that and because I don't have access to fresh milk) I use pretty much the same recipe that I normally use only replacing half the water with milk and adding honey, shea butter and vitamin e at trace.
I start by adding my lye to the 1/2 water. (in the form of ice)
I heat my honey to make it more fluid, then add it and the vitamin e to my goats milk so they can all be added at once when my soap reaches trace.
when my lye/water and oils are fully emulsified and begin to trace I add my goats milk/honey/vitamin e blend.
Last but not least I add my shea butter. You'll notice the color change due to the milk, but not to worry it will normally change back as it sets up. Anyway, after blending the shea in completely it's ready to go in the mold.
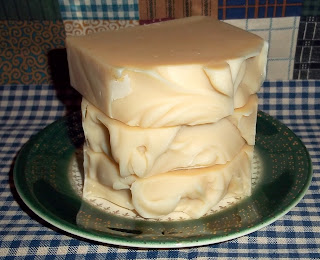
I immediately sat my mold over the air vent and put a fan on it to prevent gel phase, because I'd like for this batch to stay nice and light. By the next day when it's ready to cut it has changed back to a nice creamy color.
And here are the cut pictures.

Saturday, August 13, 2011

Making Beef Jerky

There are few foods that you could get everyone to agree on, but jerky is one that everyone in my family enjoys. And it's a GREAT snack food! Jerky is high in protein and low in fat, and when made at home you can enjoy it at a fraction of what it costs in stores. I normally use venison when making jerky, but sometimes you just can't wait till the Fall for a good batch of homemade jerky. I pretty much always use the same basic recipe. I may adjust the "spicyness" sometimes, but this is what I'll use for about 3-4 lbs of meat:

    1 C soy sauce
2 T worcestershire
2 T liquid smoke
1 T canning salt
1/2 T black pepper
1 T crushed red pepper
1/2 T garlic salt

Start out by slicing your meat. Trim away any fat. The thickness is a personal preference thing, I like somewhere between 1/8-1/4 inch. 
* slightly freeze the meat in order to make it easier to slice.

I like to mix my marinate ingredients in a shallow bowl, but a freezer bag works too.

Place one by one in the marinate so as to coat each piece, and refrigerate overnight.

I like to dry my jerky in the oven. So place the meat strips as close as possible without overlapping them on the oven rack and bake at lowest setting (150-175) for 5-6 hours.
That's it! Now get the floss ready and enjoy. :)


Saturday, July 30, 2011

Homemade Blackberry Jam

I love, love homemade jams, jellies and preserves. There's just something about that "wholesome goodness" knowing your fruits were picked fresh, and that you didn't add any flavors, colors or preservatives that makes the whole process well worth the time and effort invested. Besides that, they're just plain yummy! :) Jams aren't too difficult to make, and to be honest I usually just follow the directions on the fruit pectin box. So I won't bore you with a lot of details just what I use and the few steps to jelly making.

For a single batch I use:

5 cups crushed fruit
7 cups sugar
1 box fruit pectin

As with any canning procedure I start by sterilizing my jars.
Wash and crush ripe berries.
Measure out the ingredients, and bring the fruit and pectin to a boil. Add sugar.

Stir continually. Return to boil. When you reach a rolling boil that can not be stirred down start timing. Boil for 2 minutes. Remove from heat. Skim off any foam, and pour into hot jars leaving 1/4 inch head space.
Wipe rims of jars and cap. Invert jars for 5 minutes.
Then store upright in a cool, dark, undisturbed place, and enjoy!

Making Pumpkin Spice soap

As you probably guessed from the name, two things that this soap contains are pumpkin and spice. As with most of the soaps I do, my base oils are pretty much the same, I only need to make a few minor adjustments to create a spicy, fragrant bar that's too good to only make in the Fall. Since I'll be using 12 ounces of pumpkin, I discount my water for that amount and begin as usual mixing my lye water into my oils.
At light trace I add the 12 ounces of pumpkin.
(I used canned but it must be pumpkin not pumpkin pie mix)
I blend that completely in and add my fragrance oils. Then pour a small amount into a separate bowl where I've added 2 T of cinnamon to an ounce of warm avocado oil.
Blend in completely.
Then pour the spice part back into the pumpkin part in two-three spots. 
Then stir the pot 1-2 turns to get a nice swirl.
Now it's ready to be poured in the mold.
I normally gel this one because it's hard to avoid with the spices in there, but I wanted to try a sculpted top this time so I sat it over a vent with fan on it. It turned out pretty good. I love the Autumn orange color that you get naturally from the pumpkin, and the aroma is a "hit" year-'round.


Tuesday, July 26, 2011

Soap on a Stick...UGH!!

I love to make soaps using milk. So far I've really liked goats milk, butter milk and coconut milk. There are a few ways that milk can be used in your recipe. I like to use a half and half procedure, because that way I don't have to worry about scorching my milk with lye. Also you don't get the fowl odor and color as you can with adding lye directly to your milk. But that's just me, others use what works best for them.

The method I use isn't totally without fault though. One of the main problems you can encounter is seizing. When using such a high water discount, your soap will very rapidly reach trace when the lye water is added to the oils. So it's best to soap cool, and use fragrance oils that won't add to the acceleration of trace. I suspect the latter to be the cause of my problems in the batch I'm about to share. I call it Oatmeal Milk and Honey because I use oatmeal, buttermilk and honey in my recipe. The fragrance oil I use in it is a blend I've concocted, but probably won't be using again. :)

Anyway, I measured out my water and milk and added the lye to the water and when it cooled I added it to the oils (to which I'd already added the fo and honey). I tried to use my stick blender, but before I could grab a camera I was getting something with a consistency of mashed potatoes.
Before I could get all the milk in the batch was setting up so hard that I couldn't even stir the milk in...ugh! So I did the only thing I could do and moved it over to the stove. I heated it over medium low heat and stirred constantly. Before long it limbered up and I was able to get a more uniform consistency.

So I added the rest of my ingredients, can't have omh without oatmeal.
Okay, so it ended up really thick, but not a complete loss...whew! So I plopped it in the mold tried to get the best looking top I could with what I was dealing with and crossed my fingers. :)

For this batch I'll try another fragrance oil next time, one that won't add to the problem. Also, it wouldn't be a bad idea to stir and not stick blend, at least until I see how it's going to behave. But if worse comes to worse there is always hot process. :)

Sunday, July 24, 2011

My coconut lime embeds

I like trying new techniques, and things I've seen others do. I've done embeds a few times some shining examples are my soap ball embeds:
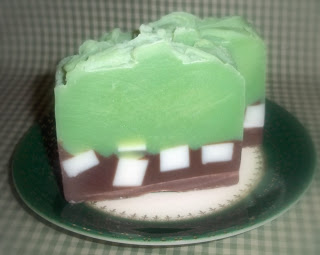
But I wanted to do something a little different, I was shooting for more of a layered look, this is what I got:
First I'll share how I did it then I'll tell you what I'd do differently next time. :) I started by cutting cubes of white soap, then making a batch of soap as I normally would. I poured off about a third of the batch in a seperate bowl and added color and fragrance to each.
Then I poured the brown part into the mold and topped it with the white cubes.
Then I carefully poured in the green remaining 2/3.
And sculpted the top a little.
It turned out ok, but it could have been better. Next time I'll make two seperate (small) batches because when you make one batch and split it, you can't wait for the bottom layer to set before pouring the top layer, because your top layer is getting thicker every second waiting. I also think it would have looked better if I had used white "rods" instead of cubes, as some bars don't appear to have as many white cubes in them. But that's how we learn, through trial and error, and it's kind of fun experimenting. :)

Friday, July 22, 2011

My flowers

As ususal summer seems to be swiftly passing by, and before you know it everything will be cold, barren, and dormant. Not trying to depress you, just trying to lay some ground work for why all these beautiful pictures were taken. lol So many of my showiest blossoms have already came and went, so I wanted to "capture" some of the beauty that I am still able to enjoy in my garden right now, before it too is gone. So, I asked my daughter-in-law to take some pictures for me so I could share them here, and I think they will make a great screen saver later when the days start growing shorter and the seasonal changes start taking their toll on me. :) ...Enough rambling, here's some pics.